Kubernetes Network
In this article, we’ll give you an in-depth look at the networking and monitoring capabilities provided by Kubernetes to prepare you for rolling out your application into a production environment with open network services and good visibility.
Kubernetes networking features
Kubernetes includes a comprehensive set of networking features for connecting Pods together and making them visible outside the cluster. Here is a summary of some of the more commonly used basic components.
Service
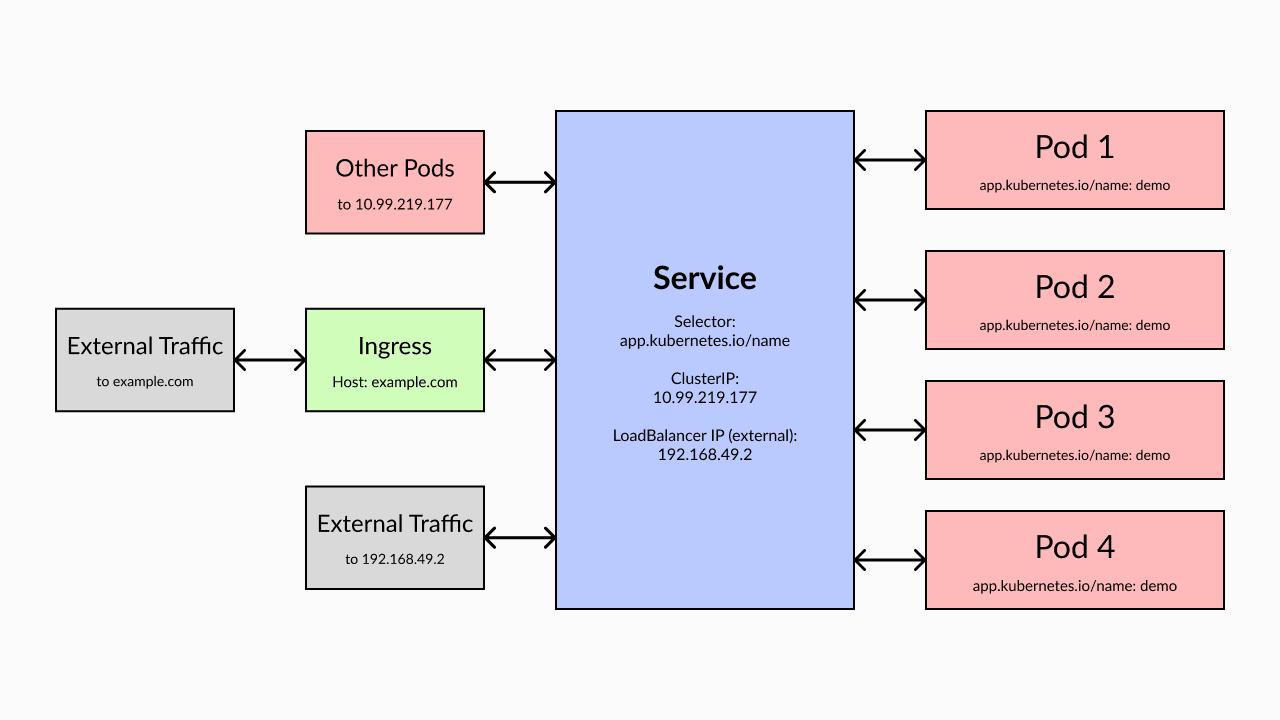
A Service is a Kubernetes object that exposes a network application running in a Pod in a cluster. Network traffic flows through the service and is directed to the correct Pod.
Service can sometimes be confusing to developers because its terminology sometimes overlaps with conventional wisdom. Developers often think of a Service as the application they run in a cluster, but in Kubernetes, a Service specifically refers to the network component that allows access to the application and is the basic resource for networking Kubernetes objects. When deploying workloads, if Pods need to communicate between them or outside of the cluster, services are required.
The Serivce model needs to be used to distribute traffic between deployment replicas. For example, if you deploy four copies of an application interface, the four Pods should share network traffic. This can be achieved by creating a Service, where your application can connect to the service’s IP address, which then forwards network traffic to one of the compatible Pods. Each Service is also assigned a predictable intra-cluster DNS name to facilitate automatic service discovery.

Kubernetes supports several different types of services to suit common networking use cases. There are three main types:
ClusterIP: This type of service is assigned an IP address and can only be accessed within the cluster. This prevents the Pod from being called externally. Because this is the most secure service type, it is also the default service type when no other service type is specified.
NodePort: These services are also assigned an internal IP address, but are additionally bound to a specified port on the node. If the NodePort service is created on port 80 and its Pod is hosted by node 192.168.0.1, you can connect to the Pod via 192.168.0.1:80 on your local network.
LoadBalancer: The LoadBalancer Service maps external IP addresses to the cluster. When using a hosted Kubernetes solution like Amazon EKS or Google GKE, creating a LoadBalancer Service automatically provides a new LoadBalancer resource in your cloud account. Traffic from the public IP address of the LoadBalancer is routed to the Pod behind the Service. Use this Service type when you intend to expose Pods publicly outside the cluster. LoadBalancer allows you to first route traffic between the physical nodes of the cluster and then route traffic to the correct Pod on each node.
Create a Service
The following YAML listing example defines a ClusterIP service that directs its port 80 traffic to port 80 of a Pod with an app label and a value of nginx.
1 | apiVersion: v1 |
Save the file as service.yaml and then apply it to the cluster using kubectl
1 | [root@ops tmp]# kubectl apply -f service.yaml |
The Pods in the cluster can now communicate with the container to connect adjacent Pods labeled app=nginx. Since the Service is automatically discovered, you can also access the service using the DNS host name assigned to it, which is of the form:
1 | <service-name>.<namespace-name>.svc.<cluster-domain> |
Use the correct Service type for internal and external IP addresses
The right type of Service depends on what you want to achieve.
If Pods only need to be accessed within the cluster, such as databases used by applications within other clusters, then ClusterIP is fine. This prevents Pods from being accidentally exposed to the outside world and improves cluster security. For applications that should be externally accessed, such as apis and websites, LoadBalancer should be used.
The NodePort Service needs to be cautious. They allow you to set up your own load balancing solutions, but are often misused with unintended consequences. When you specify port ranges manually, be sure to avoid conflicts. The NodePort service also bypasses most Kubernetes network security controls, leaving Pods exposed.
Ingress
Services can only run at the IP and port levels, so they are usually paired with Ingress objects. Ingress is a dedicated resource for HTTP and HTTPS routing. Ingress maps HTTP traffic to different services in the cluster based on request characteristics such as host names and URIs. They also provide load balancing and SSL termination capabilities.
Importantly, Ingresses is not a service per se. They are in front of the service and expose the service to external traffic. You can expose a set of Pods directly using the LoadBalancer service, but this pushes traffic without any filtering or routing support. With Ingress, you can switch traffic between services, such as api.example.com to your API and app.example.com to your front end.
To use Ingress, an Ingress controller must be installed in the cluster. It is responsible for matching incoming traffic with your Ingress object.
Ingress defines one or more HTTP routes and the services they map to. Here is a basic example of directing traffic from nginx.example.com to your demo service:
1 | apiVersion: networking.k8s.io/v1 |
The correct value for spec.ingressClassName depends on the Ingress controller you are using.


